FTP(File Transfer Protocol,文件传输协议,简称FTP)。客户端软件断点续传指的是在下载或上传时,将下载或上传任务(一个文件或一个压缩包)人为的划分为几个部分,每一个部分采用一个线程进行上传或下载,如果碰到网络故障,可以从已经上传或下载的部分开始继续上传下载未完成的部分,而没有必要从头开始上传下载。
断点上传和断点续传 一、定义 二、实现 三、参考
参考一 参考二 参考三
OAuth2.0 一、背景 在OAuth之前,Web或移动应用要访问某些受限制的资源时,一般需要通过输入用户名/密码的形式进行验证,这种形式会带来一些已知的问题。OAuth的出现就是为了解决访问资源的安全性以及灵活性,使得第三方应用对资源的访问或者微服务间的调用更加安全和便捷。
二、实现
数据库
代码实现
nginx配置
访问
三、参考
参考一 参考二
一分钟允许请求十次 一、概论 出去面试的时候,问的最多的问题就是高并发相关的,比如针对秒杀、抢购系统,如何保证每个用户只能买一次;再比如高频应用接口,如果不加控制的话别人可以轻易的写一个脚本一直刷接口,从而导致整个服务变慢甚至是拖垮。秒杀、抢购系统方案都是成熟的,可以从产品、前端、后端等多个层面去实现,至于高频接口请求的拦截则仁者见仁智者见智了。比如要求某个接口一分钟只允许请求十次,且要考虑到请求时间的均衡性(如前59秒请求了一次,最后1秒请求了9次)等。
BZ的方案是基于redis的hash实现(也可为别的数据类型),总的思路就是为每个用户设置一个key,value为请求次数,同时设置ttl为一分钟。考虑到请求时间的均衡性,还需要记录下每一次请求的时间。
1 uid : {"num" : 1, "modified_at" : 0}
二、实现
假设有三个用户A/B/C,用户ID分别为a/b/c
缓存预热,即分别初始化三个用户(项目中可以通过脚本设置,在此通过命令演示)
1
2
3
4
5
6
7
hmset user_a num 0 modified_at 0 hmset user_b num 0 modified_at 0 hmset user_c num 0 modified_at 0 expire user_a 600 expire user_b 60 expire user_c 60
handle代码
1
2
3
4
5
6
7
8
9
10
11
12
13
14
15
16
17
18
19
20
21
22
23
24
25
26
27
28
29
30
31
32
33
34
35
require 'vendor/autoload.php'; $single_server = array( 'host' => '127.0.0.1', 'port' => 6379, ); $redis = new Predis\Client($single_server); $key = 'user_a'; $bit = 60; $exist = $redis->exists($key); try{ if ($exist) { $user = $redis->hmget('user_a', ['num', 'modified_at']); if ($user[0] >= 10) { echo "too many request"; } else { $sub = time() - $user[1]; if ($sub < $bit) { echo "time too short"; } else { $redis->hincrby('user_a', 'num', 1); $redis->hset('user_a','modified_at',time()); echo "normal"; } } } else { $user = $redis->hmset('user_a', ['num' => 1, 'modified_at' => 0]); $expire = $redis->expire('user_a', 600); echo 'init success'; } } catch (Exception $e) { var_dump($e->getMessage()); }
PHP-MongoDB操作 一、环境准备
安装PHP 安装MongoDB 安装MongoDB扩展 安装composer ,中文镜像
二、存储图片
下载安装驱动库
composer安装composer require mongodb/mongodb
博主安装了多个PHP版本:/usr/local/php/7.1/bin/php /usr/local/bin/composer require mongodb/mongodb
set.php,请求后会在以下两个集合中插入记录
1
2
3
4
5
6
7
8
9
10
<?php require './vendor/autoload.php'; $ct = new MongoDB\Client("mongodb://127.0.0.1/"); $gc = $ct->test->selectGridFSBucket(); $name = mt_rand(); $file = fopen('./a.jpg','rb'); $gr = $gc->uploadFromStream($name, $file); print_r($gr);
get.php
1
2
3
4
5
6
7
8
9
10
11
12
<?php require './vendor/autoload.php'; $ct = new MongoDB\Client(); $gc = $ct->test->selectGridFSBucket(); $obj = '61406e5703c06b5916587baf';//fs.files表_id,可修改为动态获取 $id = new \MongoDB\BSON\ObjectId($obj); $str = $gc->openDownloadStream($id); $cs = stream_get_contents($str); header('Content-Type: image/jpeg; charset=UTF-8'); echo $cs;
三、使用PHP对MongoDB进行CURD操作(原生操作)
$manager = new MongoDB\Driver\Manager('mongodb://localhost:27017');
增加数据
1
2
3
4
5
6
7
8
9
10
11
12
13
14
15
16
17
18
19
20
21
// 方式一 $command3 = new MongoDB\Driver\Command([ 'insert' => 'friend', 'documents' => [ ['First Name' => "房", 'Last Name' => '瑞娜','Age' => 27], ['First Name' => "刘", 'Last Name' => '玉龙','Age' => 29], ] ]); $cursor = $manager->executeCommand('test', $command3); print_r($cursor->toArray()); // 方式二 $bulkWrite = new \MongoDB\Driver\BulkWrite(['ordered'=>true]); $dbCollectionName = 'test.friend'; $data = [ 'name' => '杨幂', 'actor' => '杨紫' ]; $bulkWrite->insert($data); $cursor = $manager->executeBulkWrite($dbCollectionName,$bulkWrite); print_r($cursor);exit;
删除数据
1
2
3
4
5
6
7
8
9
10
11
12
13
14
15
16
17
18
19
20
21
// 方式一 $command0 = new MongoDB\Driver\Command([ 'delete' => 'friend', 'deletes' => [ [ 'q' => ['First Name' => '刘'], 'limit' => 0, // 0则删除全部,1则只删除一条 ] ] ]); $cursor = $manager->executeCommand('test', $command0); print_r($cursor->toArray()); // 方式二 $bulkWrite = new \MongoDB\Driver\BulkWrite(['ordered'=>true]); $writeConcern = new \MongoDB\Driver\WriteConcern(\MongoDB\Driver\WriteConcern::MAJORITY,1000); $dbCollectionName = 'test.friend'; $extra = array('limit'=>1); $where = ['name' => '杨幂']; $bulkWrite->delete($where,$extra); $cursor = $manager->executeBulkWrite($dbCollectionName,$bulkWrite,$writeConcern); print_r($cursor);exit;
修改数据
1
2
3
4
5
6
7
8
9
10
11
12
13
14
15
16
17
18
19
20
21
22
23
24
25
26
27
28
29
30
31
// 方式一 $cmd = [ 'update' => 'friend', // collection 表名 'updates' => [ [ 'q' => ['Age' => 29], //更新条件array 'u' => ['$set' => ['name' => '修改']], //要更新的内容(这个等同于update()函数的更新的内容) 'upsert' => false, // 没有找到则插入,找到了则更新 'multi' => true // true符合条件的则全部更新,默认false只更新第一条 ], ], 'ordered' => false, // 是否依次执行updates语句,true表示执行失败后继续后面的语句,false 表示一旦失败立即返回 ]; $command6 = new MongoDB\Driver\Command($cmd); $cursor = $manager->executeCommand('test', $command6); print_r($cursor->toArray()); // 方式二 $bulkWrite = new \MongoDB\Driver\BulkWrite(['ordered'=>true]); $writeConcern = new \MongoDB\Driver\WriteConcern(\MongoDB\Driver\WriteConcern::MAJORITY,1000); $dbCollectionName = 'test.friend'; $where = ['name' => '杨幂']; $update = ['name' => '大咪咪', 'actor' => '小雪']; $extra = ['multi' => false, 'upsert'=>false]; $bulkWrite->update( $where, $update, $extra ); $cursor = $manager->executeBulkWrite($dbCollectionName,$bulkWrite,$writeConcern); print_r($cursor);
查询数据
1
2
3
4
5
6
7
8
9
10
11
12
13
14
15
16
// 方式一 $command1 = new MongoDB\Driver\Command([//查出某一个 "find" => "friend", "filter" => ["name" => "羽博"] ]); $cursor = $manager->executeCommand('test', $command1); print_r($cursor->toArray()); // 方式二 $command2 = new MongoDB\Driver\Command([ "distinct" => "friend", "key" => "Age", "query" => ["Age" => 27] ]); $cursor = $manager->executeCommand('test', $command2); print_r($cursor->toArray());exit;
统计
1
2
3
4
5
6
7
8
$where = ['name' => '修改']; $cmd = array( 'count' => 'friend', 'query' => $where ); $command = new \MongoDB\Driver\Command($cmd); $cursor = $manager->executeCommand('test',$command); print_r($cursor->toArray());
索引
1
2
3
4
5
6
7
8
9
10
11
12
13
14
15
16
17
18
19
20
21
// 添加索引 $command5 = new MongoDB\Driver\Command([ 'createIndexes' => 'friend', 'indexes' => [ [ 'name' => 'email', 'key' => array('E-Mail' => 1),//1升序0降序 'unique' => false, ] ], ]); $cursor = $manager->executeCommand('test', $command5); print_r($cursor->toArray()); // 删除索引 $command6 = new MongoDB\Driver\Command([ 'dropIndexes' => 'friend', 'index' => 'email', ]); $cursor = $manager->executeCommand('test', $command6); print_r($cursor->toArray());
四、使用PHP对MongoDB进行CURD操作(基于Composer包mongodb/mongodb操作)
安装依赖包 composer require mongodb/mongodb
五、参考
参考一 参考二 参考三
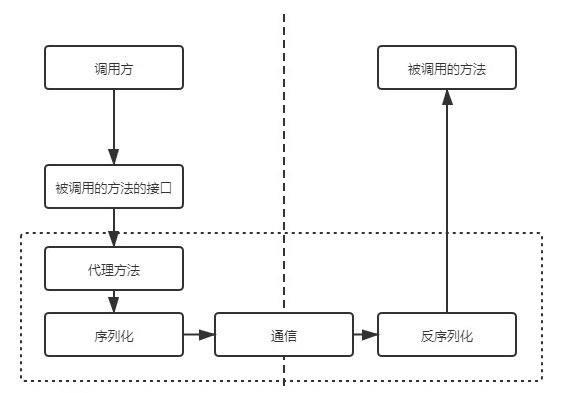
RPC示例 一、概念 RPC是一个完整的远程调用方案,它包括了接口规范+序列化反序列化规范+通信协议等,HTTP只是一个工作在OSI第七层通信协议,HTTP+Restful规范+序列化与反序列化整体构成了一个完整的远程调用方案。
二、示例
server.php
1
2
3
4
5
6
7
8
9
10
11
12
13
14
15
16
17
18
19
20
21
22
23
24
25
26
27
28
29
30
31
32
33
34
35
36
37
38
39
40
41
42
43
44
45
46
47
48
49
50
51
52
53
54
55
56
57
58
59
60
61
62
63
64
65
66
67
68
69
70
71
72
73
74
75
76
77
78
79
80
81
82
83
84
85
86
87
88
89
90
91
92
93
94
95
96
97
98
99
100
101
102
103
<?php class RpcServer { private $params = [ 'host' => '', // ip地址,列出来的目的是为了友好看出来此变量中存储的信息 'port' => '', // 端口 'path' => '' // 服务目录 ]; private $config = [ 'real_path' => '', 'max_size' => 2048 // 最大接收数据大小 ]; private $server = null; public function __construct($params) { $this->check(); $this->init($params); } private function check() { $this->serverPath(); } private function init($params) { $this->params = $params; $this->createServer(); } private function createServer() { $this->server = stream_socket_server("tcp://{$this->params['host']}:{$this->params['port']}", $errno, $errstr); if (!$this->server) exit([ $errno, $errstr ]); } /** * Description: rpc服务目录 通过客户端传值传过来 */ public function serverPath() { $path = $this->params['path']; $realPath = realpath(__DIR__ . $path); if ($realPath === false || !file_exists($realPath)) { exit("{$path} error!"); } $this->config['real_path'] = $realPath; } public function run() { while (true) { $client = stream_socket_accept($this->server, 100000); //这里的100000设置链接的超时时间 if ($client) { echo "have a new connection\n"; $buf = fread($client, $this->config['max_size']); print_r('receive data:' . $buf . "\n"); // 自定义协议目的是拿到类方法和参数(可改成自己定义的) $infos = $this->parseProtocol($buf); $this->execMethod($client, $infos["class"], $infos["method"], $infos["params"]); fclose($client); echo "close connection\n"; } } } private function execMethod($client, $class, $method, $params) { if ($class && $method) { $class = ucfirst($class); $file = $this->params['path'] . '/' . $class . '.php'; if (file_exists($file)) { require_once $file; $obj = new $class(); if (!$params) { $data = $obj->$method(); } else { $data = $obj->$method($params); } $data = $this->packProtocol($data); //把运行后的结果返回给客户端 fwrite($client, $data); } } else { fwrite($client, 'class or method error'); } } private function parseProtocol($buf) { $buf = json_decode($buf, true); return $buf; } private function packProtocol($data) { $data = json_encode($data, JSON_UNESCAPED_UNICODE); return $data; } } (new RpcServer([ 'host' => '127.0.0.1', 'port' => 9999, 'path' => './classes' #指定被调用的程序目录 ]))->run();
classes/test.php
1
2
3
4
5
6
7
8
9
10
<?php class Test { public function noparams() { return 'no params'; } public function myparams($params) { return $params; } }
client.php
1
2
3
4
5
6
7
8
9
10
11
12
13
14
15
16
17
18
19
20
21
22
23
24
25
26
27
28
29
30
31
32
33
34
35
36
37
38
39
40
41
42
43
44
45
<?php /* * RPC测试--RPC客户端 */ class RpcClient { private $urlInfo = array(); public function __construct($url) { $this->urlInfo = parse_url($url); print_r($this->urlInfo); } public static function instance($url) { return new self($url); } /* * 关键的魔术方法 */ public function __call($name, $arguments) { // TODO: Implement __call() method. //创建一个客户端 $client = stream_socket_client("tcp://{$this->urlInfo['host']}:{$this->urlInfo['port']}", $errno, $errstr); if (!$client) { exit("{$errno} : {$errstr} \n"); } $data = [ 'class' => basename($this->urlInfo['path']), 'method' => $name, 'params' => $arguments ]; //向服务端发送我们自定义的协议数据 fwrite($client, json_encode($data)); //读取服务端传来的数据 $data = fread($client, 2048); //关闭客户端 fclose($client); return $data; } } $cli = new RpcClient('tcp://127.0.0.1:9999/test'); echo $cli->noparams()."\n"; echo $cli->myparams(array("school"=>"hahah", "grade"=>3));
运行server.php
运行client.php
1
2
3
4
5
6
7
8
9
10
11
12
13
14
15
16
17
18
server端: have a new connection receive data:{"class":"test","method":"noparams","params":[]} close connection have a new connection receive data:{"class":"test","method":"myparams","params":[{"school":"hahah","grade":3}]} close connection client端: Array ( [scheme] => tcp [host] => 127.0.0.1 [port] => 9999 [path] => /test ) "no params" [{"school":"hahah","grade":3}]
三、参考
参考一 参考二
开发composer包 一、开干
注册github账号,配置ssh-key等,此处不再赘述
登录github,新建一个仓库,如my-first-packagist
回到本机,克隆刚新建的仓库 git clone https://github.com/liusirdotnet/my-first-packagist.git
切换到仓库目录 cd my-first-packagist
初始化composer.json文件 composer init
1
2
3
4
5
6
7
8
9
10
11
12
13
14
15
16
17
18
19
20
21
22
23
24
25
26
27
28
29
30
31
32
33
34
35
36
37
38
39
40
41
42
43
44
45
46
47
48
49
50
51
52
53
54
55
56
57
58
59
$ composer init Welcome to the Composer config generator This command will guide you through creating your composer.json config. // 1. 输入项目命名空间,默认【用户名/仓库名】 Package name (<vendor>/<name>) [dell/htdocs]: yourname/projectname // 2. 项目描述 Description []: 这是一个测试 // 3. 输入作者信息,可以直接回车,默认当前git配置的信息 Author [test <123@qq.com>, n to skip]: // 4. 输入最低稳定版本,stable, RC, beta, alpha, dev Minimum Stability []: dev // 5. 输入项目类型, Package Type (e.g. library, project, metapackage, composer-plugin) []: library // 6. 输入授权类型 License []: MIT //github建仓库时可指定,不写的话packagist会报错 > Define your dependencies. // 7. 输入依赖信息 Would you like to define your dependencies (require) interactively [yes]? // 7.1如果需要依赖,则输入要安装的依赖 Search for a package: php // 7.2输入版本号,如需多个则重复7.1和7.2 Enter the version constraint to require (or leave blank to use the latest version): >=5.6 // 8. 是否需要require-dev,操作同7 Would you like to define your dev dependencies (require-dev) interactively [yes]? { "name": "yourname/projectname", "description": "这是一个测试", "type": "library", "require": { "php": ">=5.6" }, "require-dev": { "php": ">=5.6" }, "license": "", "authors": [ { "name": "test", "email": "test@qq.com" } ], "minimum-stability": "dev" } // 9. 是否生成composer.json Do you confirm generation [yes]? yes
编辑composer.json文件,添加自动加载
1
2
3
4
5
"autoload": { "psr-4": { "namespace_name\\": "src/" //自定义命名空间名称,和类文件命名空间保持一致 } }
新建src/Test.php
1
2
3
4
5
6
7
8
9
10
11
12
13
14
15
16
17
18
19
20
21
22
23
24
25
26
27
28
29
30
31
<?php /** * This is a test class * * @detail null * @author Name <email@email.com> * @date 2018-06-17 * @version v1.0 */ namespace Liusir; // 注意命名空间与composer.json中的一致 class Test { /** * This is a test function * * @access public * @param string $arg1 参数一的说明 * @param int $arg2 参数二的说明 * @param mixed $mixed 这是一个混合类型 * @return array 返回类型 * @author Name <email@email.com> * @date 2018-06-17 */ public function testFunc() { echo 'This is a test script'; } }
生成vendor目录 composer install
跟src同级目录新建demo.php
1
2
3
4
5
6
7
require './vendor/autoload.php'; use Liusir\Test; $test = new Test(); $test->testFunc();
提交并推送到github
1
2
3
git add . git commit -m 'first commit' git push
发布到packagist
注册packagist
点击submit
将github仓库输入到输入框,Check && Submit
切换到另一个项目目录,安装刚发布的包 composer require liusirdotnet/my-first-packagist,报错
1
2
3
4
[InvalidArgumentException] Could not find a matching version of package liuyulong/second-packagist. Check the package spelling, your version constraint and that th e package is available in a stability which matches your minimum-stability (stable). require [--dev] [--prefer-source] [--prefer-dist] [--no-progress] [--no-suggest] [--no-update] [--no-scripts] [--update-no-dev] [--update-with-dependencies] [--update-with-all-dependencies] [--ignore-platform-reqs] [--prefer-stable] [--prefer-lowest] [--sort-packages] [-o|--optimize-autoloader] [-a|--classmap-authoritative] [--apcu-autoloader] [--] [<packages>]...
打一个tag并推送到github
1
2
3
git tag -a v1.0 -m 'first tag' git push git push origin v1.0
回到github后台并进入当前仓库,点击release选项,点击Draft a new release按钮,勾选下面的This is a pre-release,最后点击Publish release按钮
切换到另一个项目目录,安装刚发布的包 composer require liusirdotnet/my-first-packagist
新建index.php
1
2
3
4
5
6
<?php require './vendor/autoload.php'; use RabbitMQ\RabbitMQ; $ob = new RabbitMQ; $ob->test();
设置更新composer包自动更新packagist【github停止此服务了】
在packagist后台获取 API Token
进入当前仓库,点击settings,点击add service,选择packagist,输入表单后添加add service按钮,最后点击Update service
Note: GitHub Services have been deprecated. Please contact your integrator for more information on how to migrate or replace a service with webhooks or GitHub Apps.
二、参考
如何建立自己的composer包 开发一个自己的composer包